|
by Charles Colerich for Horizon Carbide Here are four guidelines to help improve your threading process when threading on a lathe. 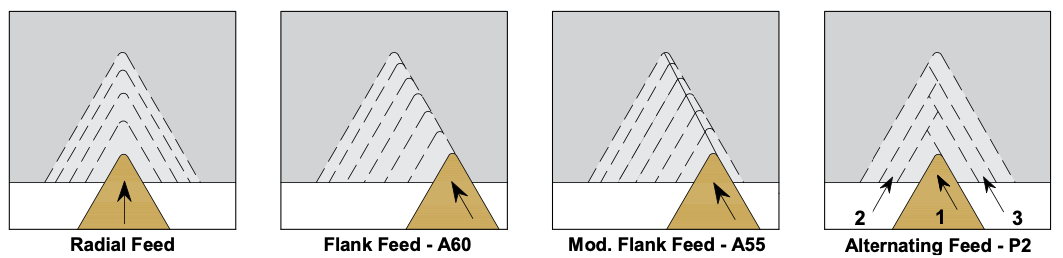 In most applications A55 will double or triple tool life over A60 1. Start Near the top of the SFM rangeAs a good rule of thumb, always start near the top of the Surface Foot per Minute Range for the material that is being threaded. Higher SFM reduces Built-up Edge, the major cause of poor tool life in threading. For Harder or more Abrasive Materials start in the Middle of the SFM range. Once setup is complete SFM can be adjusted for optimum tool life. Tough Micrograin Grade 310 reduces insert chipping from edge build-up at lower SFM and on parts under 1” Diameter. Formulas to calculate Revolutions Per Minute (RPM) and Surface Feet Per Minute (SFM) : RPM = SFM x 12 Divided by Part Diameter x 3.1416 SFM = 3.1416 x Part Diameter, Divided by 12 x RPM 2. Use the G76 Threading CycleAs a second good rule of thumb, use the G76 Threading cycle with Fanuc, Yasac and similar CNC controllers. If P1, P2, P3, & P4 parameters are available, use P1 for most applications. G76 - P1 removes equal amounts of material with every pass. P2 alternates between front & back cutting edges and should only be used on 6 tpi & coarser threads. 3. Set Depth of Cut for the 1st Pass at 20% - 30%Set the Depth of Cut (DOC) for the first past at 20-30% of the thread height per side. G76 controls the depth of cut for the remaining passes. To find the DOC for the 1st Pass multiply the PITCH by 0.6 to get the approximate THREAD HEIGHT. Multiply THREAD HEIGHT by 20 - 30% to get the DEPTH of the 1st Pass. Use less than 20% when threading hard materials or larger thread pitches. Do not use “Spring Passes” under .002 DOC Per Side. EXAMPLE: CALCULATING THE DOC FOR THE FIRST PASS ON A 1/2-20 THREAD 1” 20 =.050PITCH),(.050x.6 =.030 (THREADHEIGHT), .030x.3 =.009 (DEPTHOF1stPASS 4. Use the A55 Parameter to set the Infeed AngleMost CNC Lathe Controls offer a choice of A60, A55, A30 & A29. A60 is the default setting. A55 is equivalent to setting the compound feed on a manual lathe to 27.5°. In most applications A55 will double or triple tool life over A60.
0 Comments
The power and strength is where it needs to be - times two.  Power up your parting off with WhizTwin WhizCut has re-invented the parting off insert for the future. WhizTwin is a bold new insert that helps reduce waste material and has a cutting edge stability. The patent pending design of WhizTwin generates a cutting edge stronger than any other and a stability not seen before. The strength and increased stability of the cutting edge is maximised with two cutting edges at the front. This lets the toolholder be clamped in a more stable position with a smaller overhang from the toolholder plate - reducing instability and vibrations which are the main chal-lenges when parting off. Less material waste, less costs. WhizTwin is forceful, stable and overall brilliant. The narrow insert allows you to lower your production cost as you save material using it. Removing less bar material is great for you and also for the environ-ment. It’s a win win - with WhizTwin. Power up your parting off |


| Increase Number of Teeth For:
Decrease Number of Teeth For:
|  |
Rake Angles and
Side Clearance Angles
RAKE ANGLES
Just as in an end mill or a band saw blade, a rake angle is the term used to describe the direction of the blade’s teeth, as referenced from the rotation and central axis of a saw blade. If you imagine a line going from the exact center of the blade to each tooth, having the front of the tooth directly on that line would be a zero degree rake angle. The rake angle of the blade is described in comparison to that imaginary line.
A positive rake angle meana that the teeth are angled more towards the angle of rotation, while a negative rake angle would mean that they are angled backwards, away from the direction of rotation. Generally speaking, the preferred rake angle is:
SIDE CLEARANCE (Tangential Clearance Angle)
This is also known as dish or hollow grind. You measure down the side of the tip and the difference it is the difference between front and back. As you cut, material it gets compressed and springs back after the cutting edge passes.
A steep side clearance angle gives plenty of room for the material to expand and prevents thermal expansion of the base material. Keep in mint that a very flat side clearance angle can provide a smoother cut in some materials. For stainless steel and tenacious metals such as copper, zinc, tin or lead an increase in the side clearance is desirable as these materials tend to "spring back" (thermal expansion) on the blade.
Just as in an end mill or a band saw blade, a rake angle is the term used to describe the direction of the blade’s teeth, as referenced from the rotation and central axis of a saw blade. If you imagine a line going from the exact center of the blade to each tooth, having the front of the tooth directly on that line would be a zero degree rake angle. The rake angle of the blade is described in comparison to that imaginary line.
A positive rake angle meana that the teeth are angled more towards the angle of rotation, while a negative rake angle would mean that they are angled backwards, away from the direction of rotation. Generally speaking, the preferred rake angle is:
- 5° to 10° positive for other soft materials.
- 5° negative for yellow brass
- On center for steel.
SIDE CLEARANCE (Tangential Clearance Angle)
This is also known as dish or hollow grind. You measure down the side of the tip and the difference it is the difference between front and back. As you cut, material it gets compressed and springs back after the cutting edge passes.
A steep side clearance angle gives plenty of room for the material to expand and prevents thermal expansion of the base material. Keep in mint that a very flat side clearance angle can provide a smoother cut in some materials. For stainless steel and tenacious metals such as copper, zinc, tin or lead an increase in the side clearance is desirable as these materials tend to "spring back" (thermal expansion) on the blade.

See the MicroGrad wrench demonstrated in the video below!
In the below video Matt Saccomanno the founder of Masa Tool describes how the Microconic workholding system functions without the need for an extended nose collet:
The Microconic cartridge replaces the extended nose collets and provides not only better clearance but more rigidity and accuracy in the sub spindle of a CNC Swiss Style lathe.
According to Saccomanno, "The accuracy and rigidity greatly improve with the diameter clearance already built into the system."
Edited by Bernard Martin
Often times in a shop, a saw arbor is a saw arbor is a saw arbor. That's just not the case and Martindale Gaylee offers several solutions. They have variants to saw arbors to meet your specific needs whether it be in a CNC milling machine, a CNC Lathe, a manual mill or even a Swiss Style CNC machine. This includes:
Let's take a look at the differences below.
Often times in a shop, a saw arbor is a saw arbor is a saw arbor. That's just not the case and Martindale Gaylee offers several solutions. They have variants to saw arbors to meet your specific needs whether it be in a CNC milling machine, a CNC Lathe, a manual mill or even a Swiss Style CNC machine. This includes:
- TI-LOC® Saw Arbors with integrated ER taper
- Gold Star Precision Series Saw Arbors
- General Purpose Series Saw Arbors
- Custom Saw Arbors
Let's take a look at the differences below.
TI-LOC® Saw Arbors with integrated ER taper
 |  Twist and snap into any ER clamping nut. No special holding nuts required. |
The Ti-Loc® SwissClamp System is a taper-integrated small tooling system is designed to work with virtually any collet or tool holder that employs the ER collet system (DIN6499). The Ti-Loc directly mounts into ANY ER Taper Live or Static Tool Position.
The Ti-Loc® System works with any existing tool holder and most all ER collet clamping nuts. Simply insert the Ti-Loc holder into any ER nut and twist to align the locking cam profile jus was you would for any ER collet.
The Ti-Loc® SwissClamp System can be used in any machine that has ER collet live tooling. It comes standard with ER 11, ER16 and ER20 taper arbors that serve as their own collet, eliminating need for two-piece arbor system.
This single piece design adds rigidity of set-up and improves total indicated runout (TIR). In fact, it reduces tolerance “stacking” to an incredibly low TIR of less than 0.0002". To top it off, it's less expensive & more cost effective than most comparable two-piece arbor systems.
A recommended maximum saw thickness is approximately 0.080”
Gold Star Precision Series
Saw Arbors

Gold Star Precision Series Saw Arbors
Martindale Gaylee also offers a Gold Series reach arbor. These arbors are heat treated and ground to 0.0004” T.I.R. concentricity and squareness.
The Gold Series are engineered for use with carbide saws and where accuracy is a must. This VIBRA-CORE design, along with the deep low profile caps, gives extra support and less vibration.
The Gold Series are engineered for use with carbide saws and where accuracy is a must. This VIBRA-CORE design, along with the deep low profile caps, gives extra support and less vibration.
General Purpose Series
Saw Arbors

General purpose slitting slotting saw arbor
Martindale Gaylee's general purpose slitting/slotting saw arbors are all ardened all over (58/60 Rc) for added toughness on cutter locating surfaces and shanks.
The General Purpose Series Saw Arbors shanks ground to within 0.001" T.I.R. of cutter location diameter. They have an extra long, strong body with a protective black oxide finish. The super low profile on caps allows the cutter to reach areas inaccessible with conventional arbors.
Stout plug: extra support, less vibration sum up the benefits of this style. Oh, and Weldon style shanks are readily available.
Custom Saw Arbors

An example of a Custom Saw Arbor
Can be made extra-long for reach beyond or inside part features
- Accommodates multiple cutters for straddle or profile
- Different outside diameter cutters on the arbor
- ID grooving operations
- Made with or without keyways

Sspec your own custom saw arbor
BREAKING NEWS
Check the category list below for your subject of interest. We bring you the latest breaking news and tech tips here!
Categories
All
AB Tool
Accu-Hold
Achteck
Achteck AP100S
Arbor: Custom
Arbor: Gold Star
Arbor: Ti-Loc Swiss
Balance Systems
BlueGrip Adhesive
Blue Photon
BRISC Magnetics
BRM - Brush Research
B-Safe X System
Carbide Insert Height
Carbide Inserts
Carbide Insert Thickness
Carbide Insert Tolerance
Carbide Saws
CFT Coolant Fed Tooling
CNC Milling
CNC Swiss
CNC Turning
Drilling
George Whalley
GMN USA
Horizon Carbide
IMTS
Inserts
Jergens
Jergens 52-96
Jergens Ball Lock
Jergens Fixture Pro
Machine Tool Monitoring
MAQ
MAQ Devibe Bar
MAQ Digital Protractor
Martindale Saw
Masa Microconic
Micrograd
Pratt Burnerd
Saw Arbor
SOPH Magnetics
SOUTHTEC
Spade Drills
Tapmatic
Tapmatic TapWriter
Tech Tips
Toolholder Insert Height
Troubleshooting
Turning: ID Grooving
Turning: OD Grooving
Turning: Threading
WhizCut
WhizCut PZ
WhizHip
WhizTwin
Widen
Workholding
Workholding Magnetic
Archives
March 2024
February 2024
January 2024
December 2023
November 2023
October 2023
September 2023
August 2023
July 2023
June 2023
May 2023
April 2023
March 2023
February 2023
January 2023
December 2022
November 2022
October 2022
September 2022
August 2022
April 2022
January 2022
July 2021
 RSS Feed